
Physical products go through user testing before they are marketed. These tests help producers ensure their goods are usable and solve real life problems. The same idea applies to digital products.
Well-conducted tests can dramatically improve the usability and quality of your designs, and save you a lot of time and money. It’s important to catch problems in the early stages of your mobile app development through user testing, a crucial part of the UX design process.
Here at The Mobile Company, we believe that good design solutions are those that prove to be useful to end users. So we love to validate our solutions to find usability flaws and deliver continuously better products to our customers.
Why do we love user testing? The key benefits:
- Finding errors quickly, and learning on the go
- Low cost, high return
- Interacting with end users in their working environment
Want to learn how user testing will benefit your project and product? Below I’ll explain the main advantages of testing and our own go-to method, devices and tips.
Ready to test and looking for help? Use this guide as your kick-off! Setting up a user testing lab is a lot easier than you might think. I’ll share everything you need to get going. You just have to plan how and when to conduct your test.
Let’s start!
Tools
1. Silent laptop
You’ll need a laptop to record the mobile screen and the face(s) of your participant(s).
Tip: when testing, you’ll probably run Skype, screen recorders and other software that require processing power. You don’t want to hear the cooling fans during your test sessions.
2. Test phone with a beautiful prototype
Participants will use it to test your live app or prototypes. Download Marvel App or InVision to display your prototype. Usually, single projects are free.
3. M&M’s
You can always add some food to it. Participants will love it.
Always works!
Optional tools
4. Lookback
Lookback is a great tool for collaborating with your colleagues. Write comments inside the testing recordings directly on the cloud and share a selected part of the session with external stakeholders. It’s also a neat platform to organize your videos.
5. Skype or similar
With Skype, you can livestream to the observatory room. Having your product team in the observatory room means they get feedback directly from users and immediately see the problem points within the app, which is a great benefit. We find this to be more effective than sharing recordings afterwards.
Tip: don’t forget to turn off the microphone in your observatory room. Instead, turn on Skype’s automatic answer function on your lab laptop.
6. Mr. Tappy or webcam
Mr. Tappy is basically a webcam with a stand, designed to show finger movements on mobile screens. Upsides: perfect tool for mobile testing. Downsides: weight and cost.
If you have the time, consider opting for a DIY kit. Some useful sources:
Basic setup
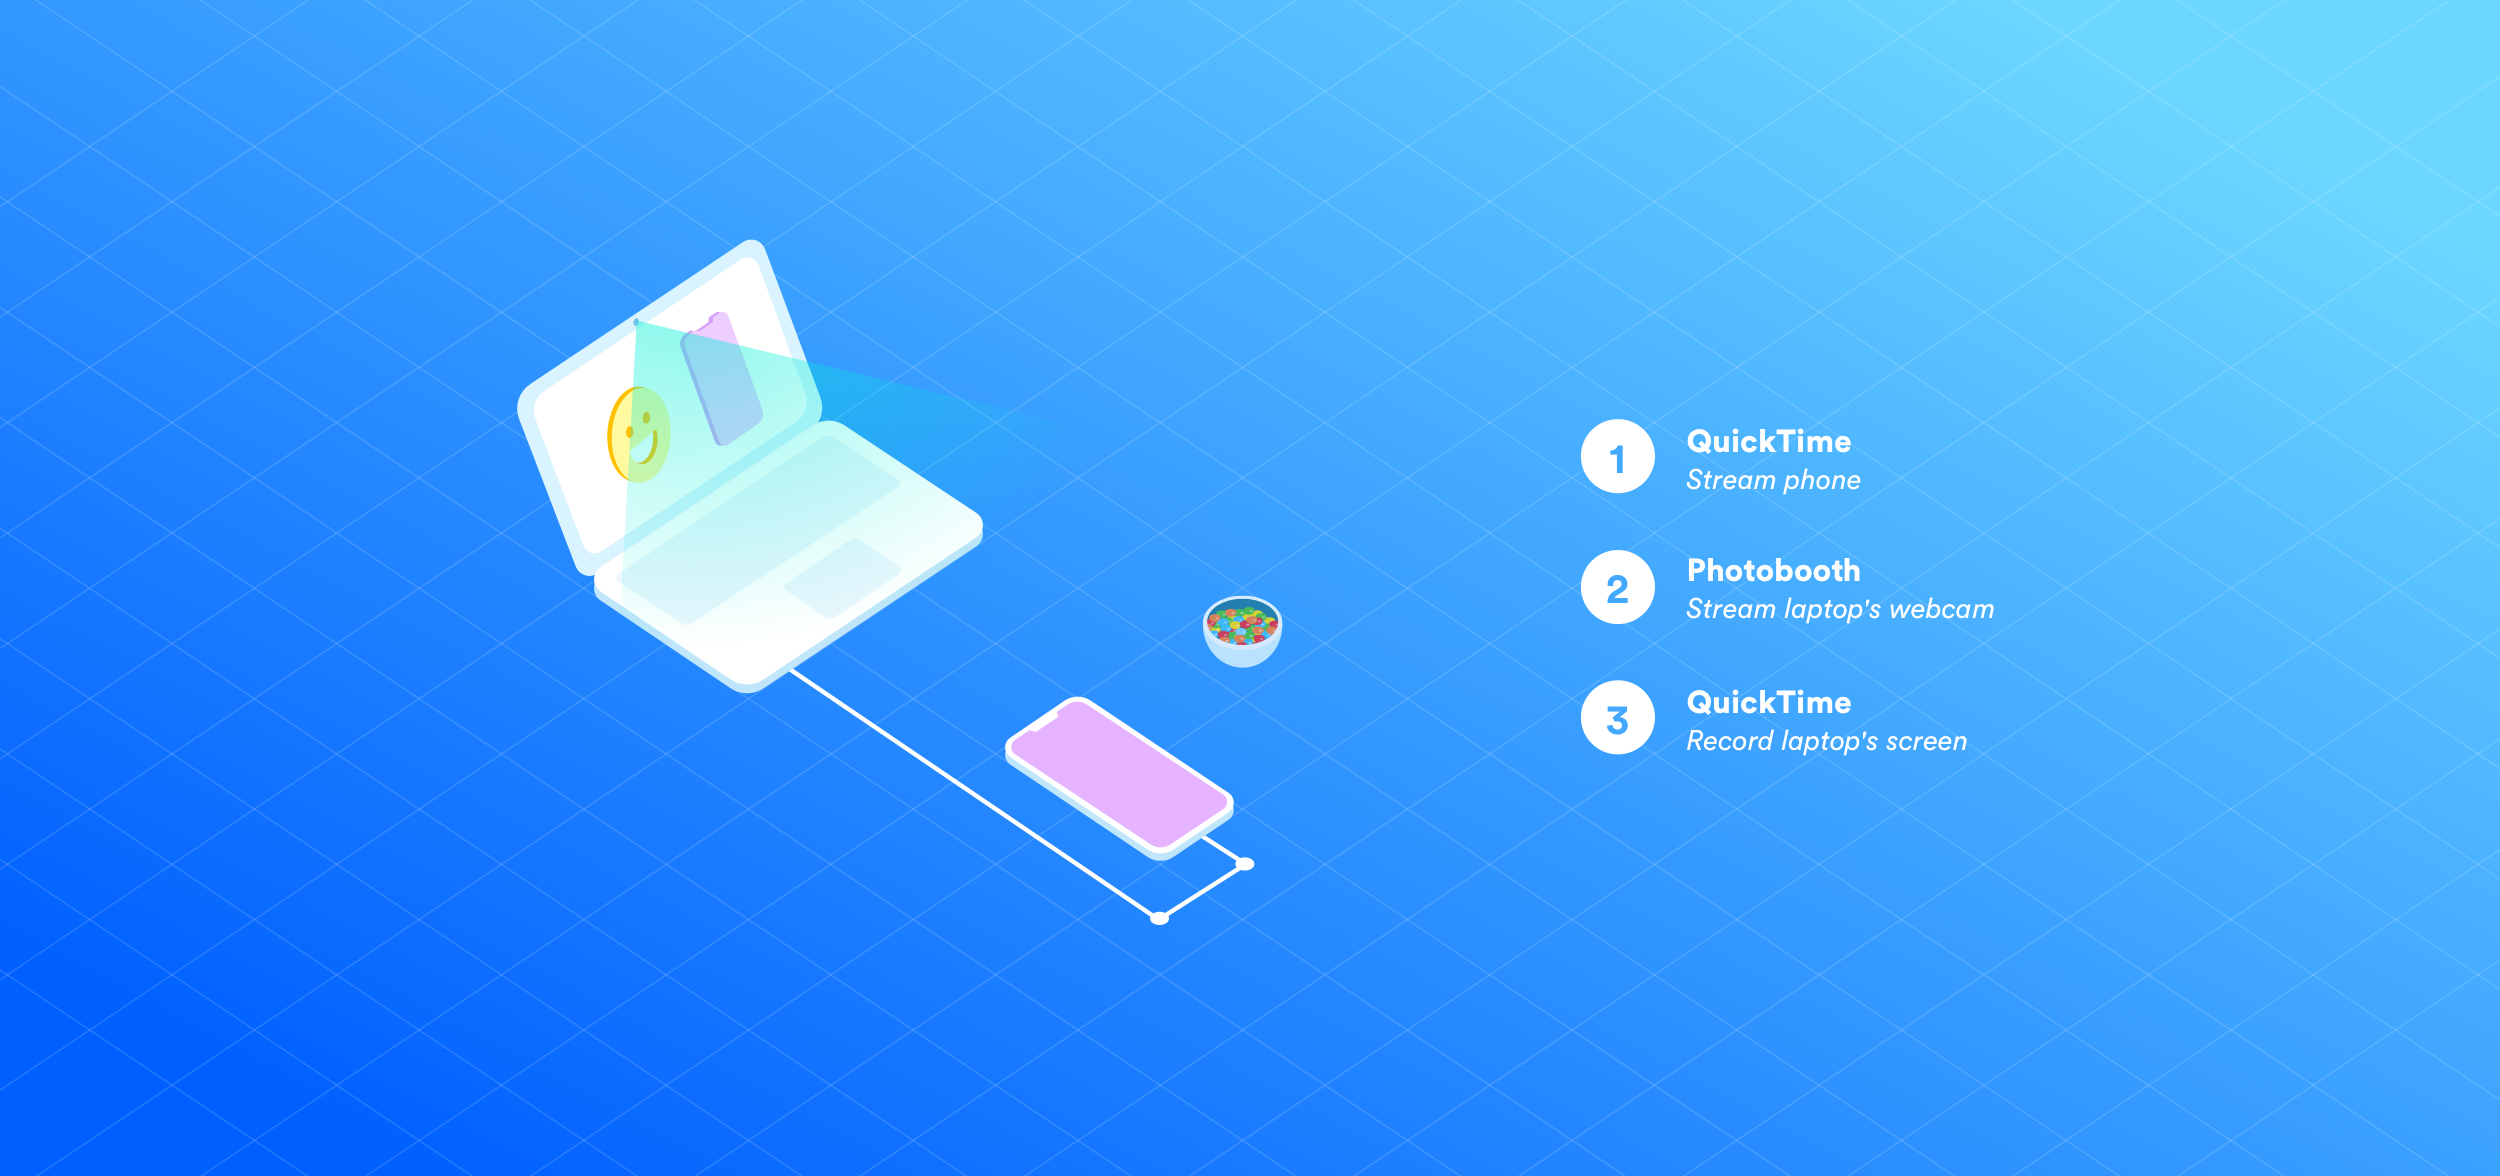
If you only aim to record the phone screen and the face of your participant, then this setup is for you. You just need a laptop and mobile device to master this setup.
1. Stream the screen of your mobile device to your computer with QuickTime.
2. Open Photobooth, and put the participant’s face next to the QuickTime window.
3. Open QuickTime and record the computer screen.
Tip: don’t forget to turn off the screen during the session. You don’t want to needlessly distract your participant!
Ultimate setup
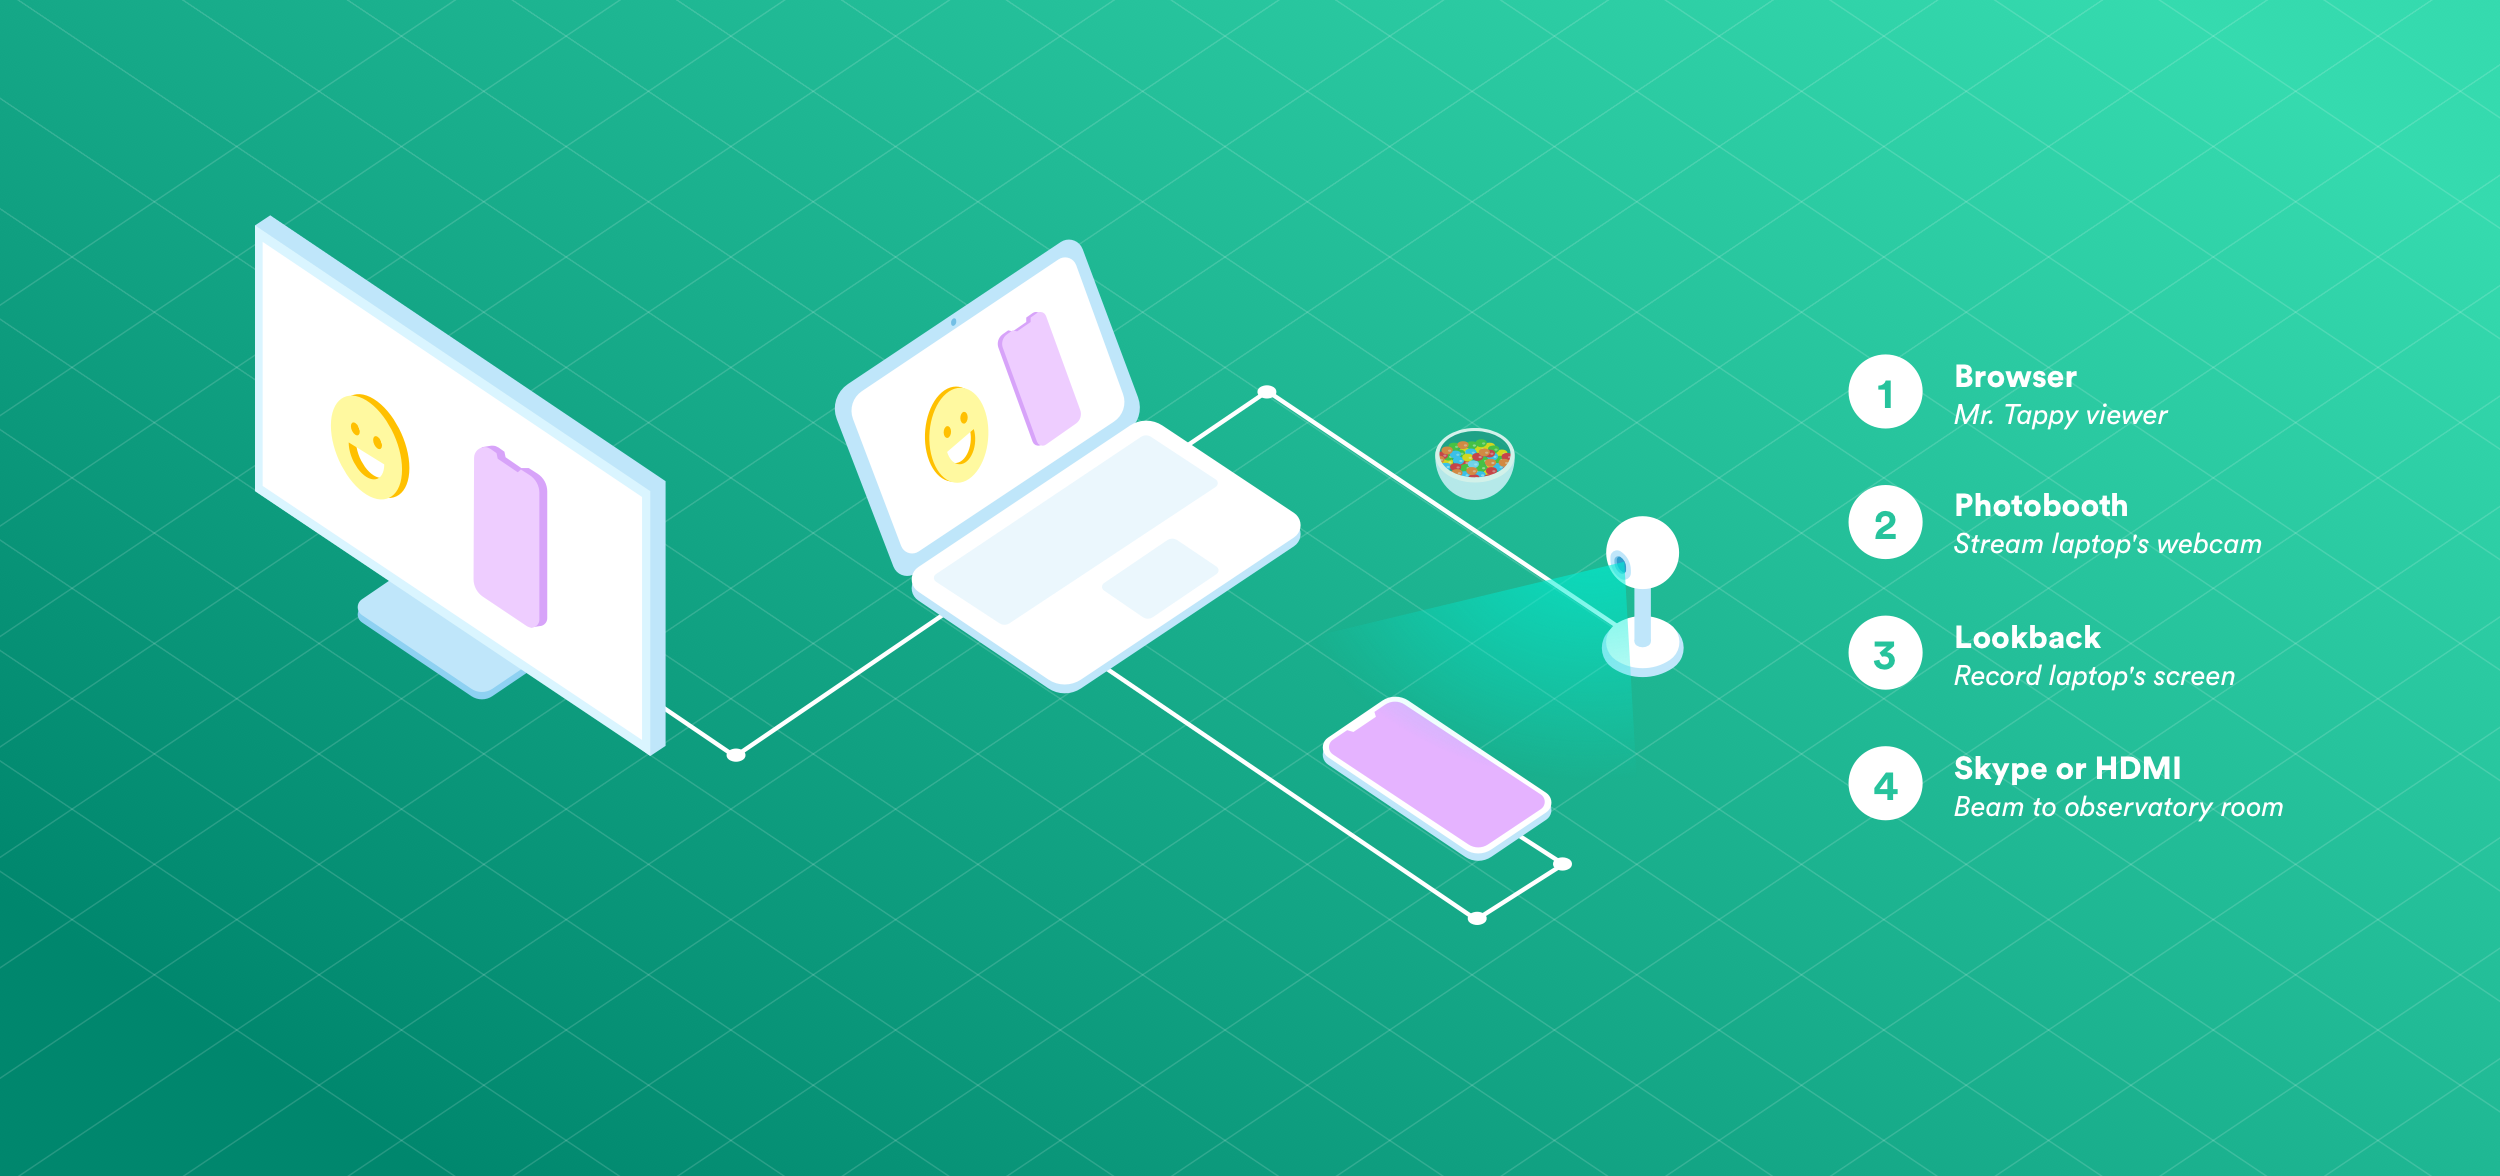
If you want to get the finger gestures and stream the session to your observatory room, then this setup is for you. Plus, using Mr. Tappy or an external camera will give you higher image and voice quality.
To master the ultimate setup, add Mr. Tappy or an external camera and arrange an observatory room with a TV in addition to the basic setup.
1. Stream Mr. Tappy or an external camera to your laptop in your browser.
2. Open Photobooth and put the face of your participant next to the QuickTime window. You can also use Lookback to stream the camera.
3. Record the session with Lookback’s Chrome extension.
4. Stream the laptop screen to the observatory room with Skype or HDMI.
How to conduct the test?
Before the test
Test scenarios are as important as your lab setup to gain high quality insights. Use different scenarios depending on the products you’d like to test.
To get a good overview and define your primary goals, answer the following questions about your participants:
- Why do your users need your product?
- What is their main motive to use it?
- What do they do for a living? Is this related to your product?
- Do their skills affect how they use the product? And if yes, how?
- What are their previous experiences with the product (yours or the competitor’s)?
During the test
When testing, it’s important to ask open-ended questions as they’ll help you learn the language of your users, discover their thought and behaviour process, and gather enough evidence for you to know which steps you should take next.
Don’t ask (too often) if participants did or didn’t like something. Instead, aim to learn and understand what their experience was when using it.
After the test
- Look for key frustration points
- Identify the parts of your product that users perceive as problematic
- Distill and summarize the overall perception of your product
- Iterate your design and keep testing
User testing is a lot easier than you might expect. Early stage testing will save you plenty of resources, as reversing the effects of poor usability gets more expensive (and frustrating) midway or at the end of the production cycle. It’s your secret not so secret superpower to make well-informed and actionable decisions quickly, based on actual data from real people.
If you really want to listen to your users, there is nothing stopping you. We can help. With years of experience in designing, developing and testing premium enterprise-level apps loved by millions of people, we’re just one call away.